Adding Acme Certification
Introduction
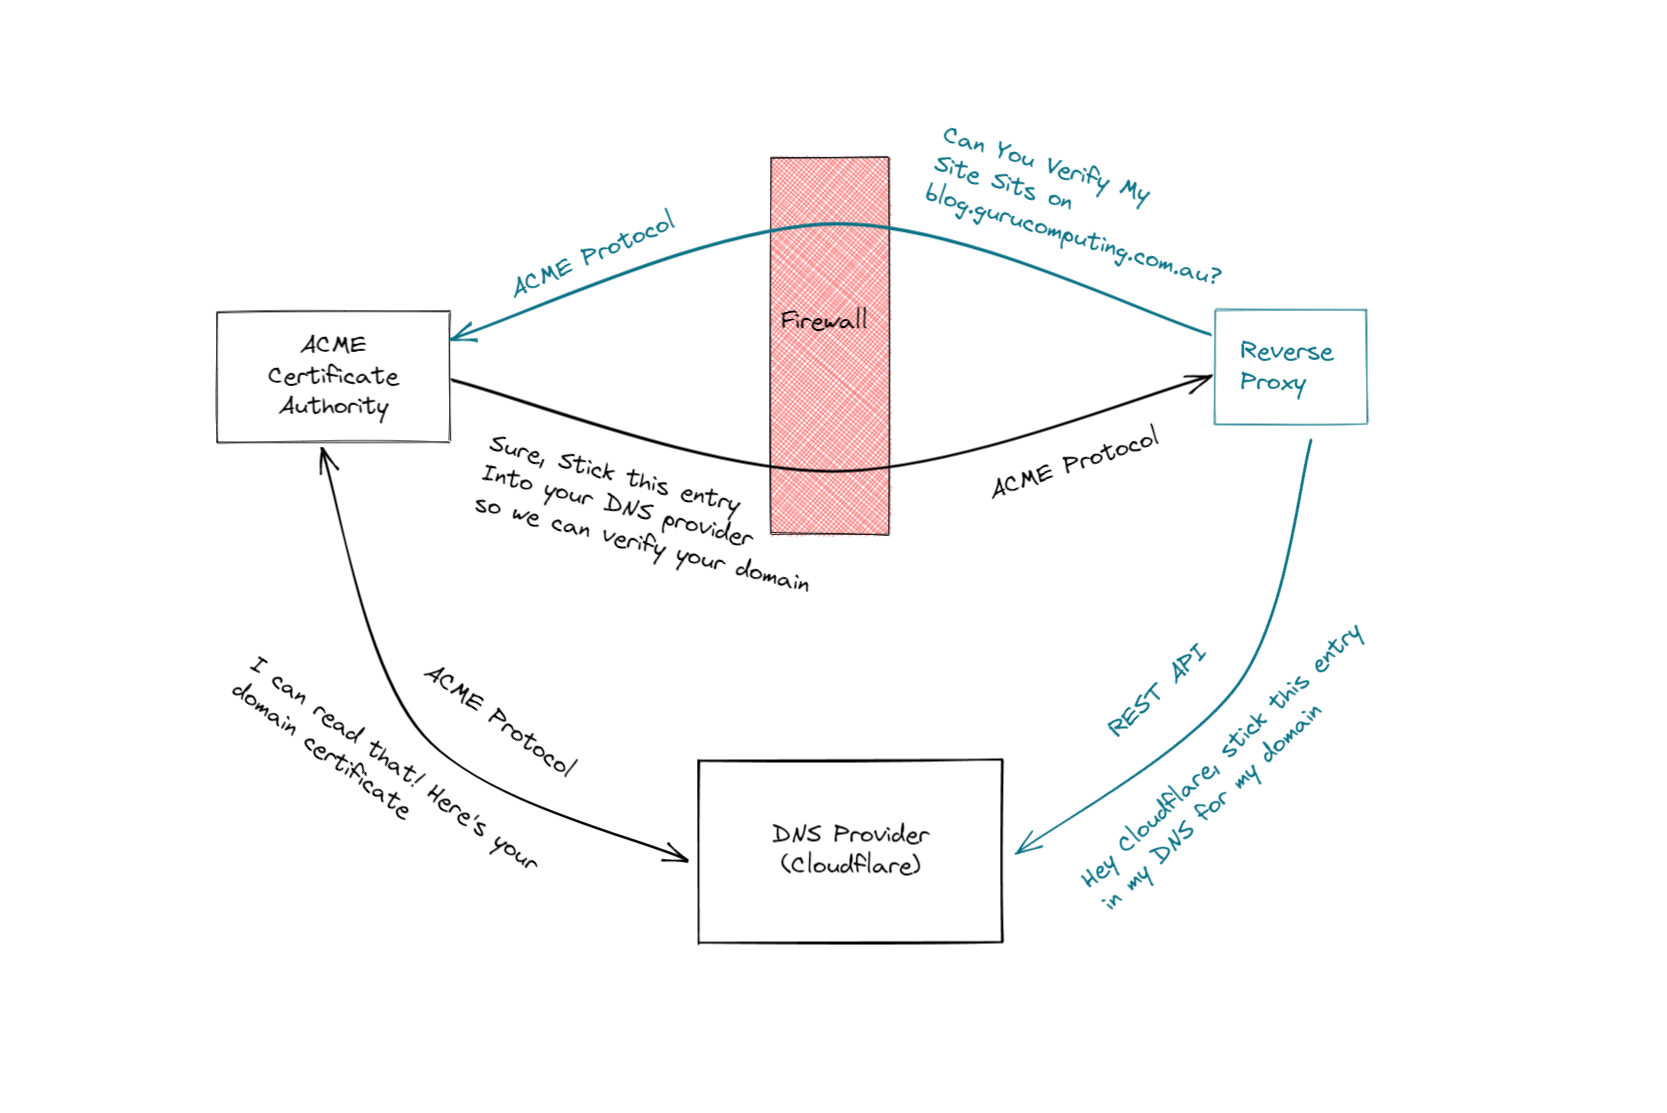
So, certificates are a tricky thing. They heavily rely on a chain of trust. IE: your certificate can be traced back in a cryptographically secure manner back to a source, and that source can in turn verify that your certificate is what it says it is. The whole system relies on domains to work properly, which is why having a publicly registered domain is a pre-requisite here.
Info
You can use any domain registrar. I recommend Cloudflare as they also provide other useful services.
So far the certificate we have been using does not have a chain of trust. Well, at least not one outside of the computer we generated the certificate on. That’s why we get a scary warning. Instead, we will use caddy to perform the hard work of doing a signing loop for us.
The ACME Protocol
So how can we get a valid HTTPS certificate, signed by a certificate authority, so our site looks valid? Well we can do it the boring manual way, generating a Certificate Signing Request (CSR), having an authority sign that request, and returning a signed certificate. No thanks.
Instead, the good people at let’s encrypt developed the ACME protocol: a completely automated way to generate and provide signed certificates to sites like yours or mine. Let’s encrypt (and other services like zeroSSL) even provide a completely free service to do this for us!
The two most widely used options are the DNS and HTTP challenge methods.
DNS ACME Challenges
If you have a choice, DNS is the way to go. However there are a couple pre-requisites. You need:
- A Public DNS Domain, registered with a Domain Registrar. I recommend cloudflare and will be using it as an example
- Your DNS provider to be available from the list of providers found in the dns.providers modules. You can use a free cloudflare account to forward your nameserver if you aren’t on the list.
What you don’t need is to forward ports to the internet, if you choose not to. This is a very good thing!
Building Caddy
First problem we need to face is getting caddy to talk directly to our DNS provider. Caddy has lots of provider plugins, but they aren’t built in -- we have to add them. Luckily this isn’t too difficult.
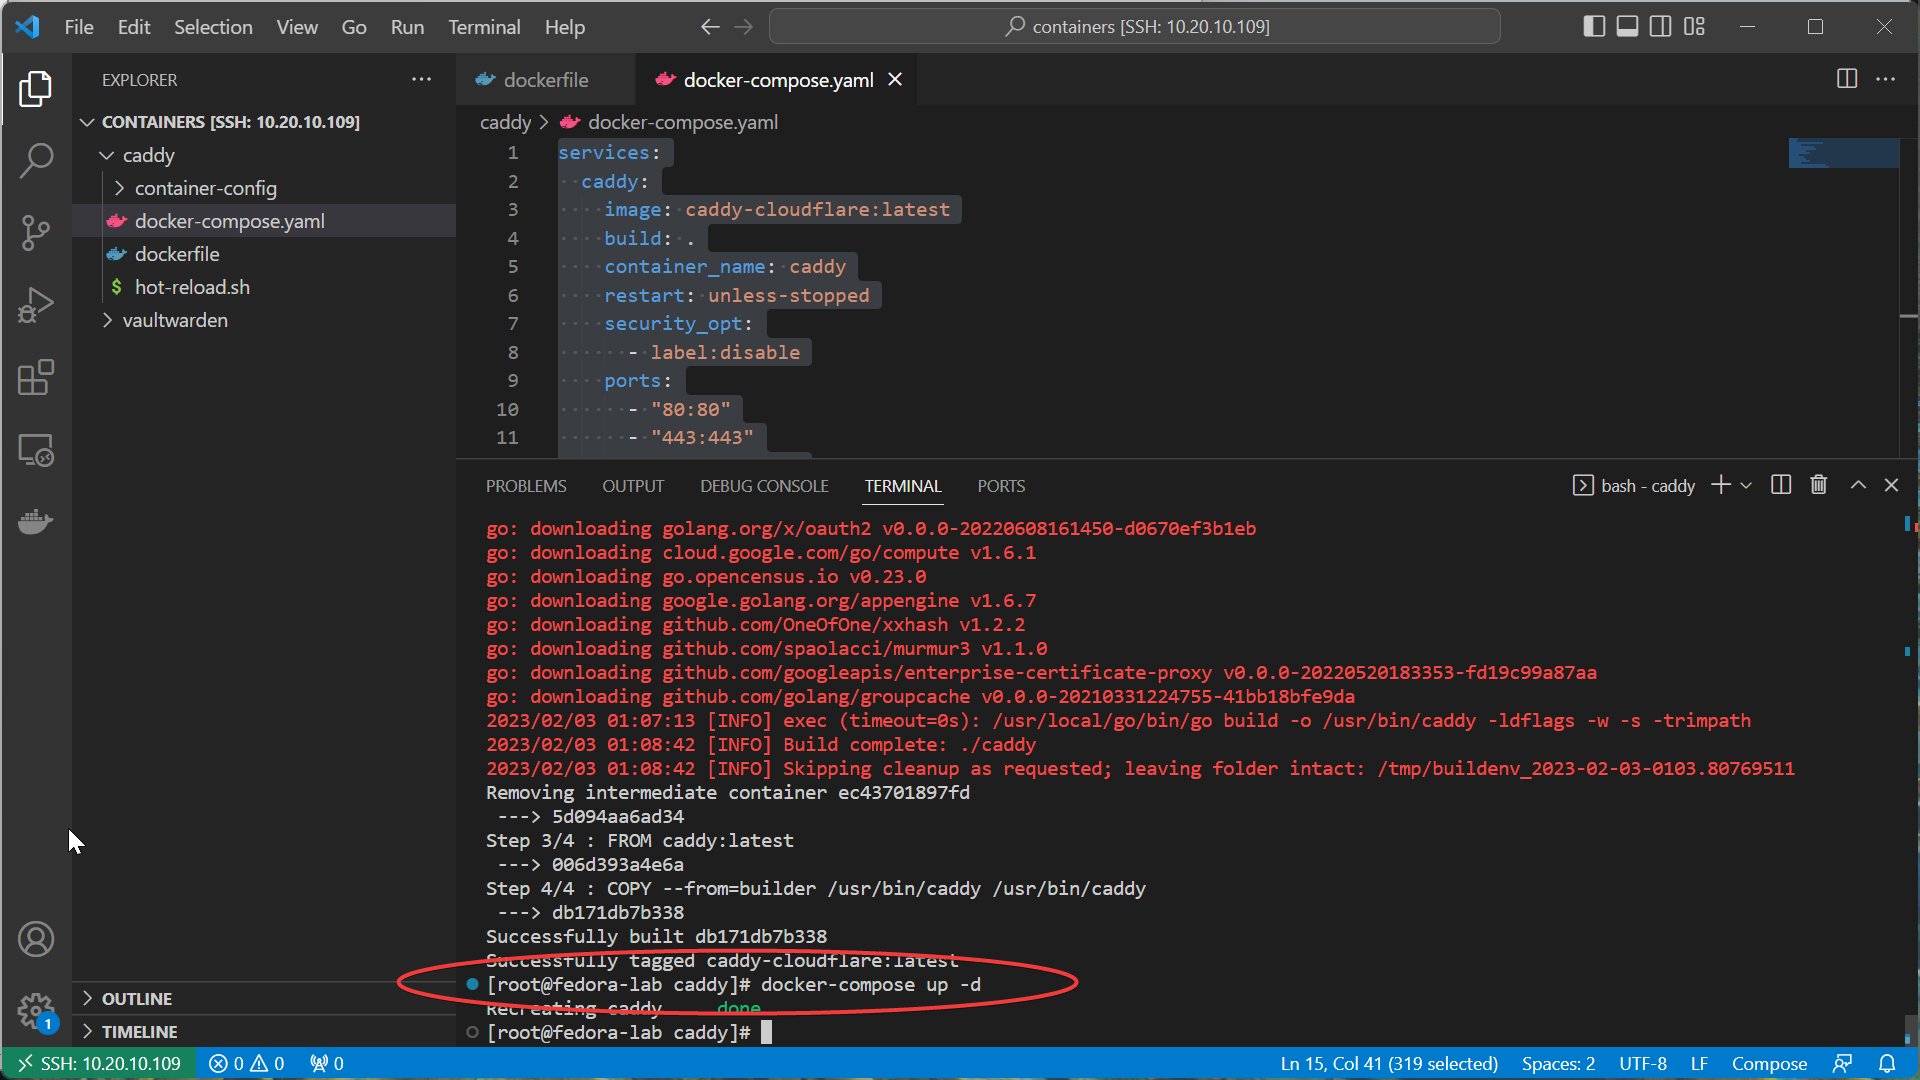
- Create a new Dockerfile in your
caddydirectory. Include the following:
FROM caddy:builder-alpine AS builder

RUN xcaddy build --with github.com/caddy-dns/cloudflare

FROM caddy:latest

COPY --from=builder /usr/bin/caddy /usr/bin/caddy
- Build the new caddy image with:
Info
go get a coffee, it’ll take 10 mins or so
- Update the docker-compose to use the special tagged version of caddy.
services:
  caddy:
    image: caddy-cloudflare:latest
    build: .
    container_name: caddy
    restart: unless-stopped
    security_opt:
      - label:disable
    ports:
      - "80:80"
      - "443:443"
      - "443:443/udp"
    volumes:
      - ./container-config:/etc/caddy
      - /etc/localtime:/etc/localtime:ro
- bring up with
docker-compose -d
API Keys
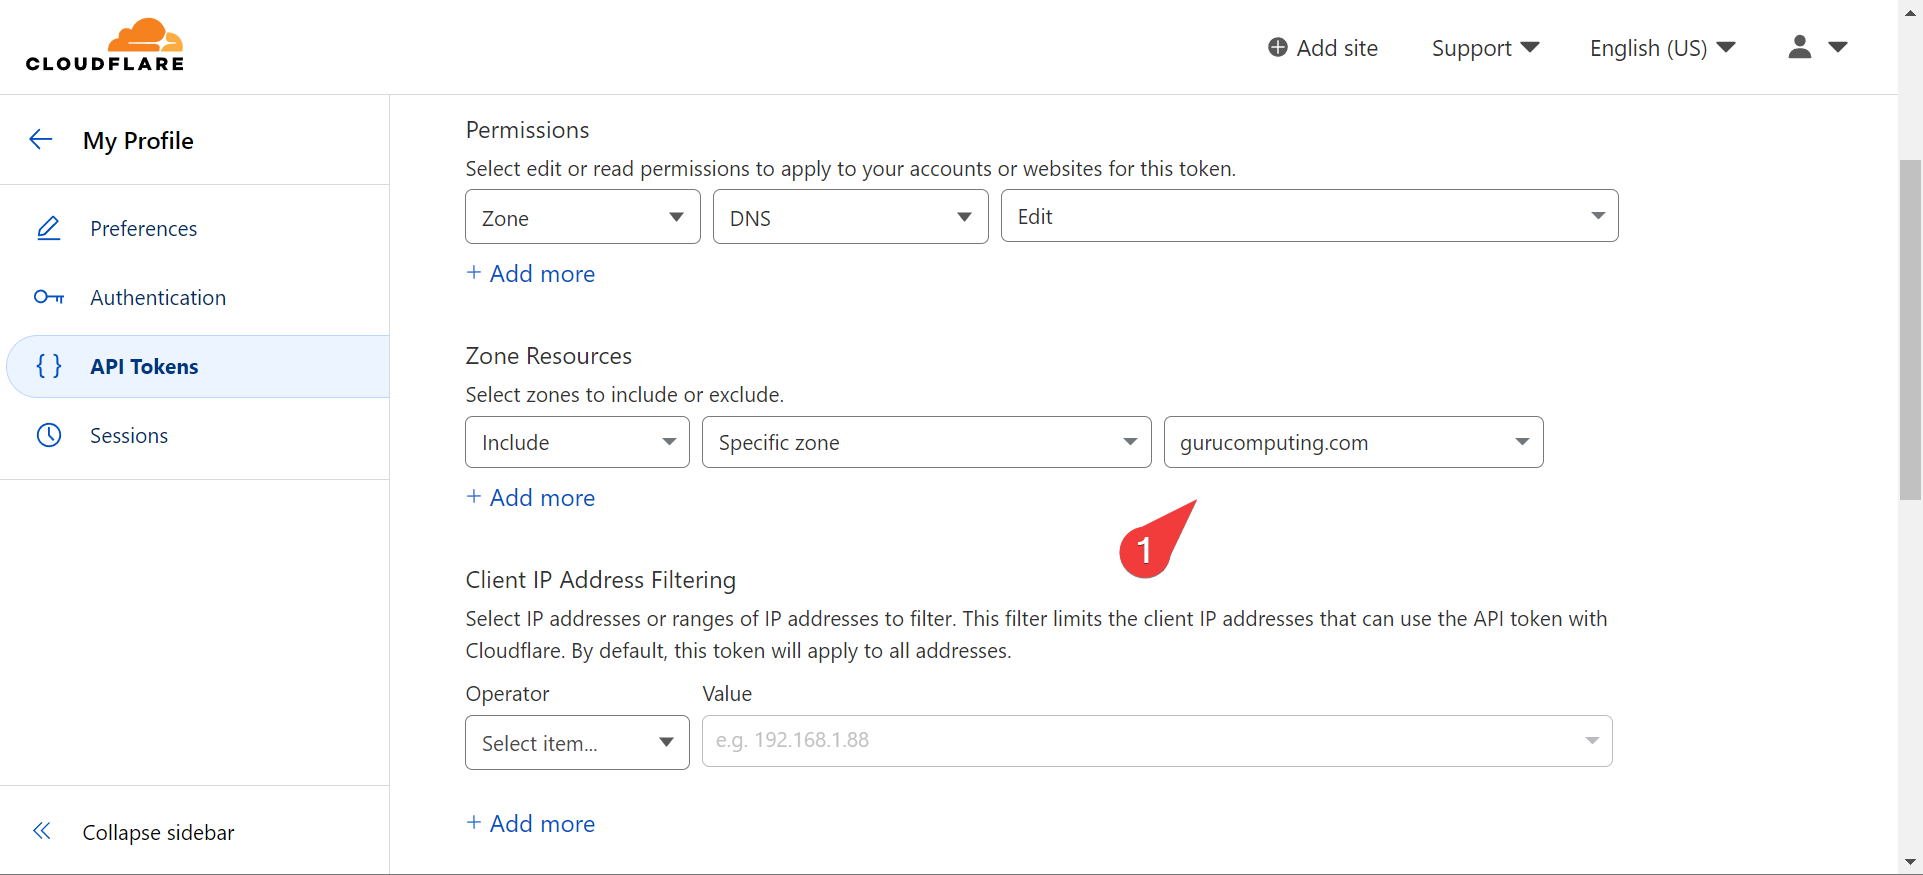
Now get an API key from your DNS provider. Here’s how to do it with cloudflare:
- navigate to https://dash.cloudflare.com/profile/api-tokens and create an API Token
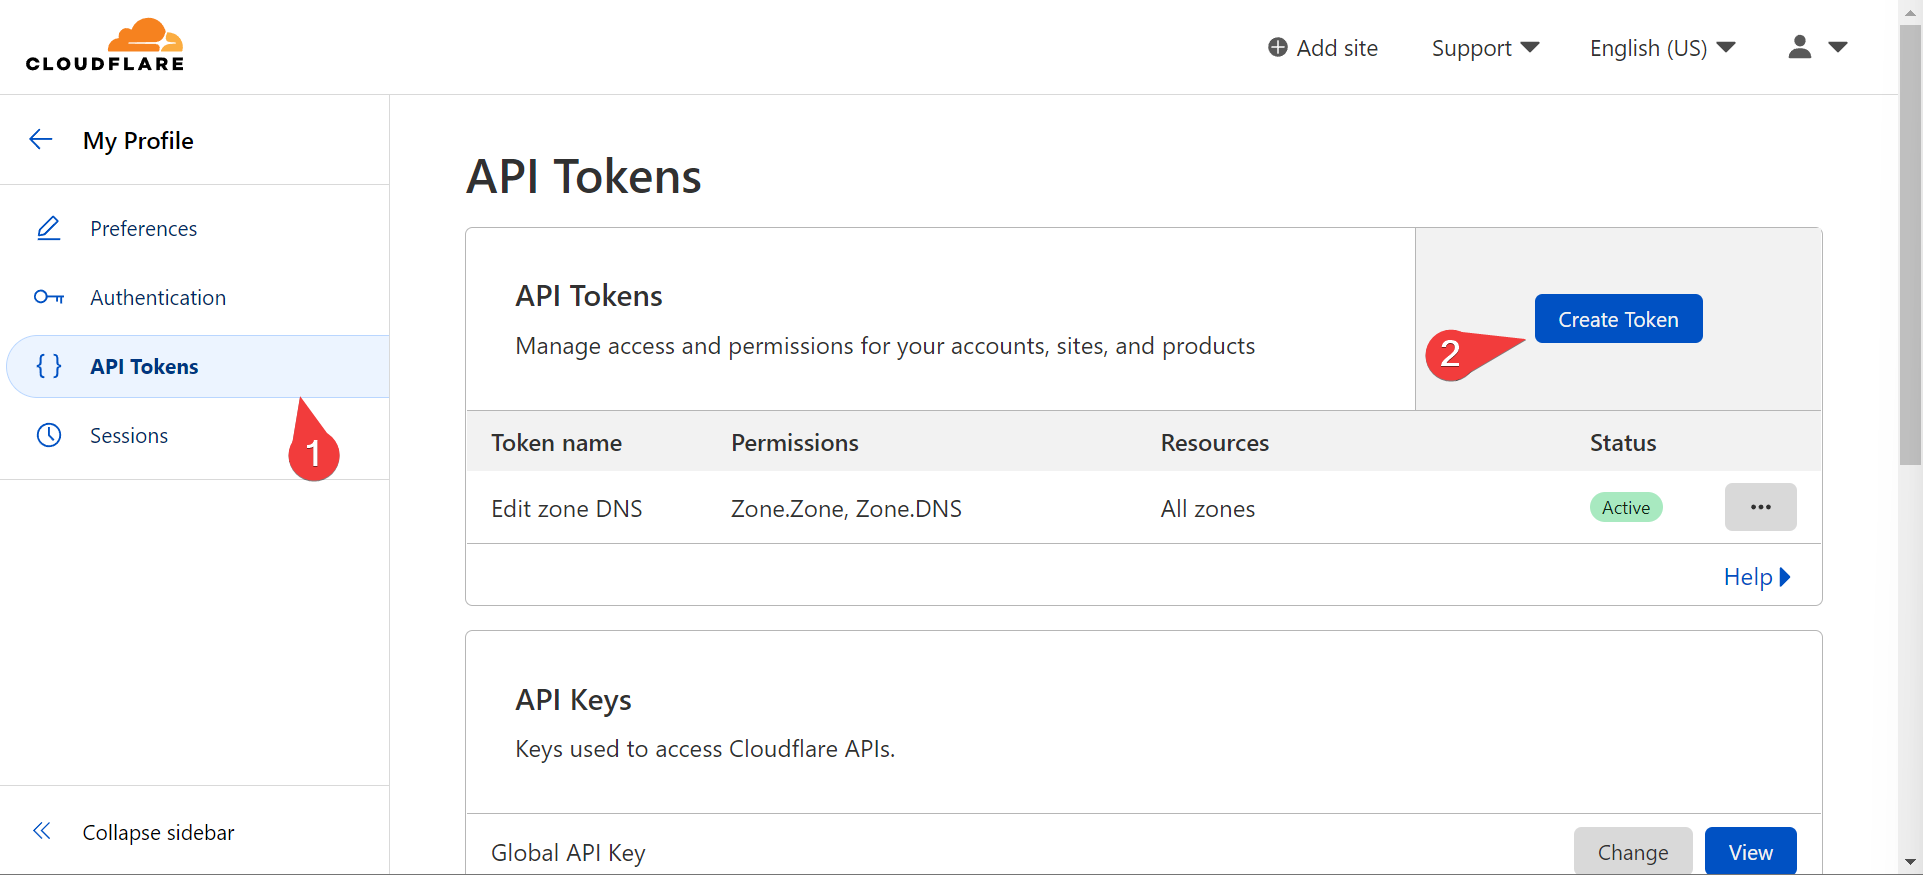
- Use the “Edit Zone DNS” template and set an expiration date
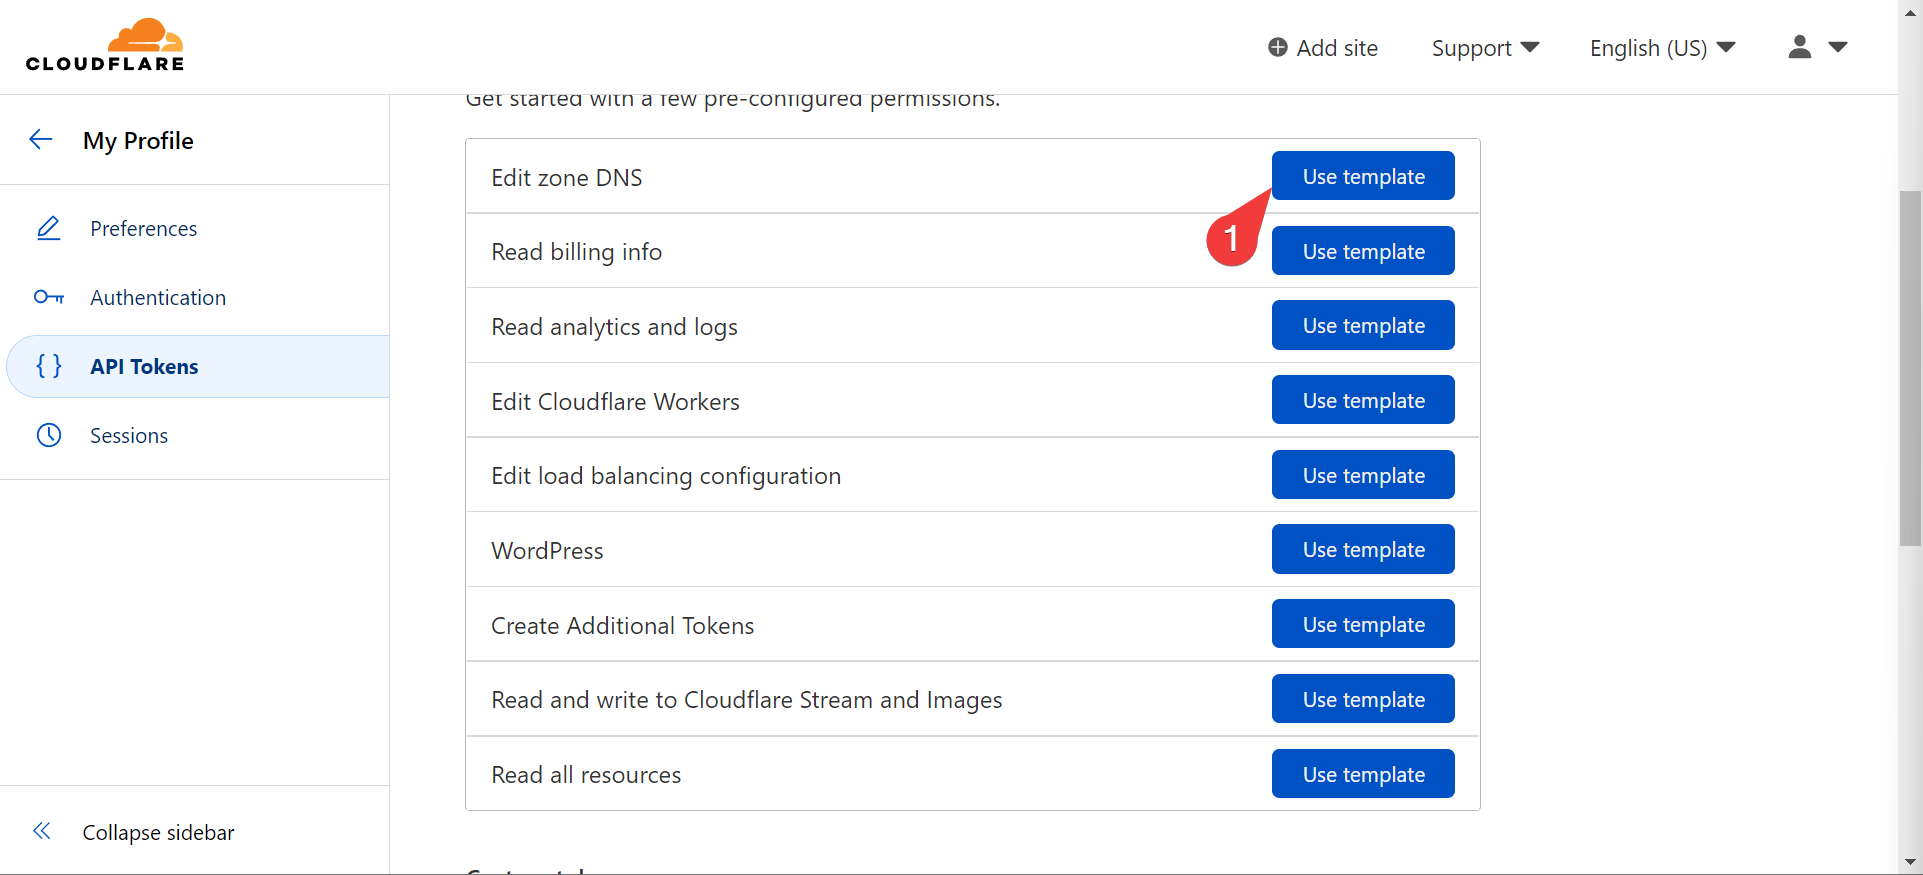
- Choose the domain you’re generating a token for
Modify the Caddyfile
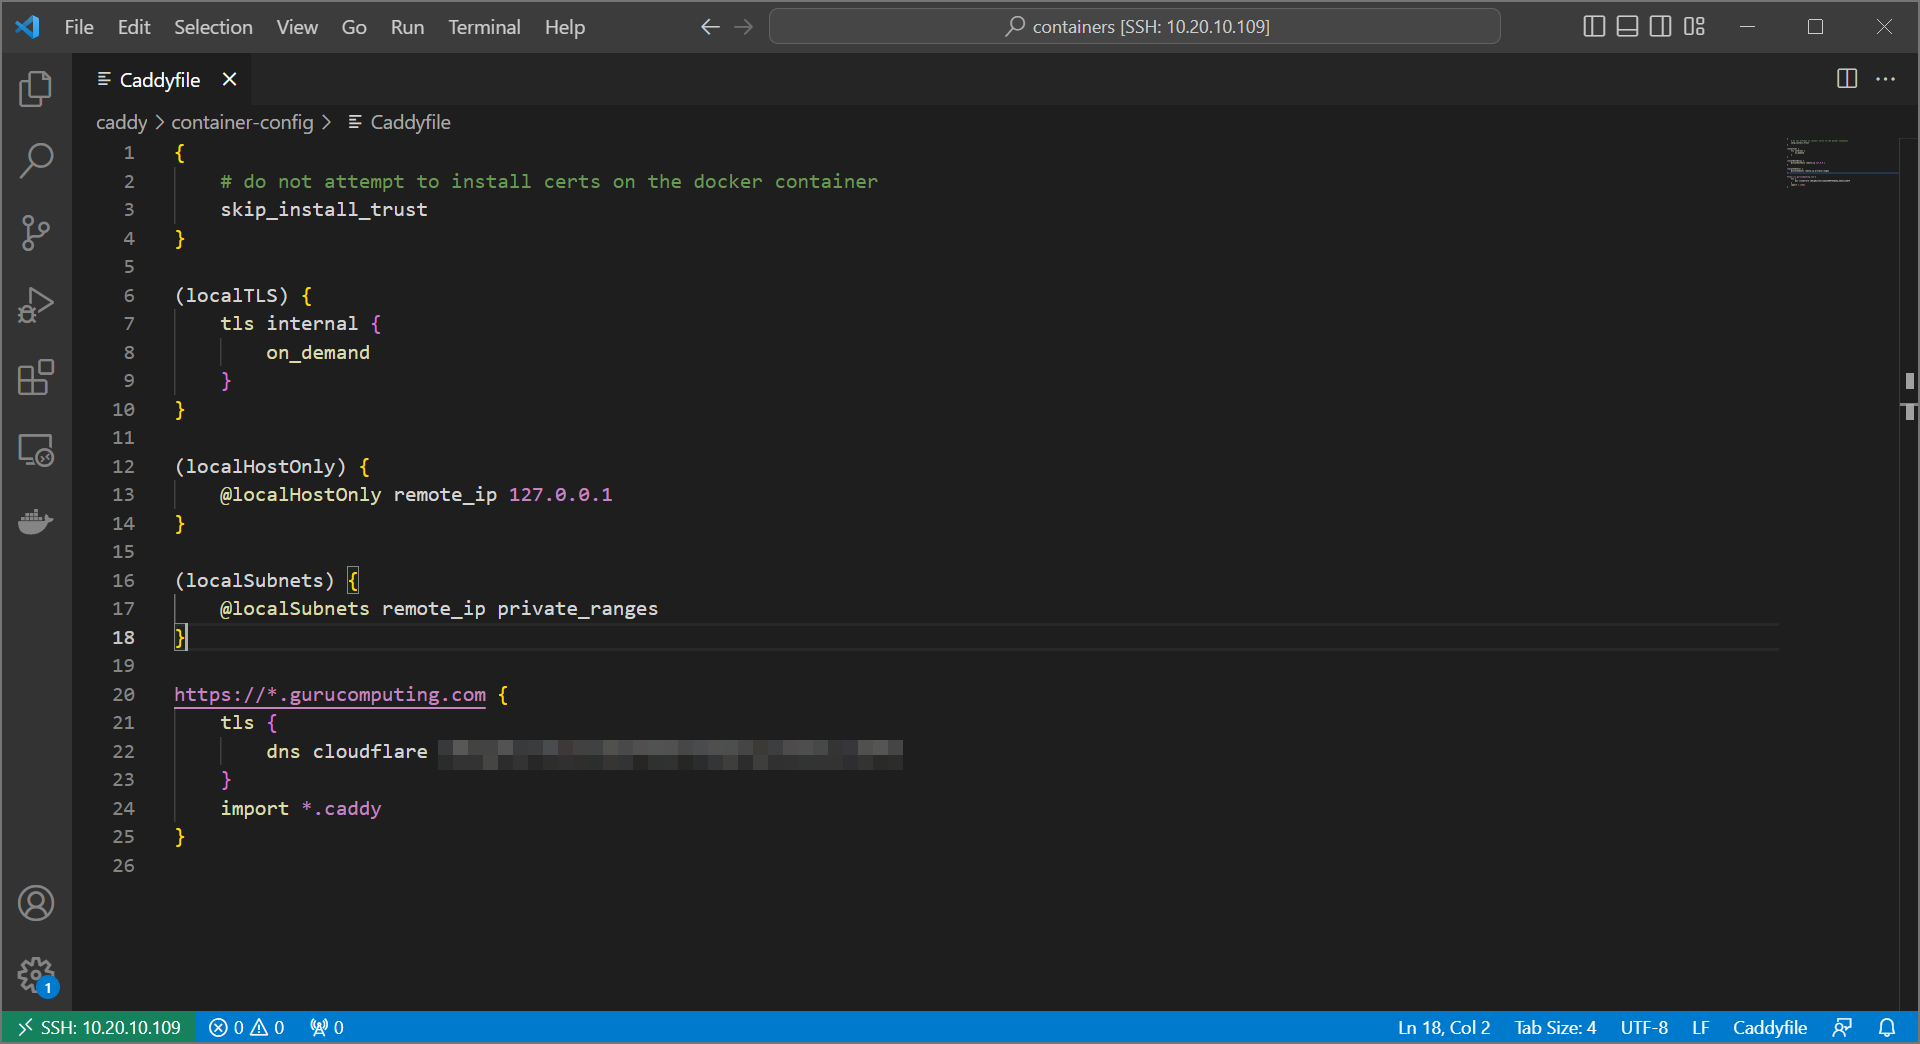
- Take your generated token and place the API key in your Caddyfile. Move the
importdirective into a wildcard site.
Info
If you plan to use multiple domains (not subdomains), you must set a different import wildcard for each set of snippets.
{
    # do not attempt to install certs on the docker container
    skip_install_trust
}

(localTLS) {
    tls internal {
        on_demand
    }
}

(localHostOnly) {
    @localHostOnly remote_ip 127.0.0.1
}

(localSubnets) {
    @localSubnets remote_ip private_ranges
}

https://*.gurucomputing.com {
    tls {
        dns cloudflare <your-API-Key>
    }
    import *.caddy
}
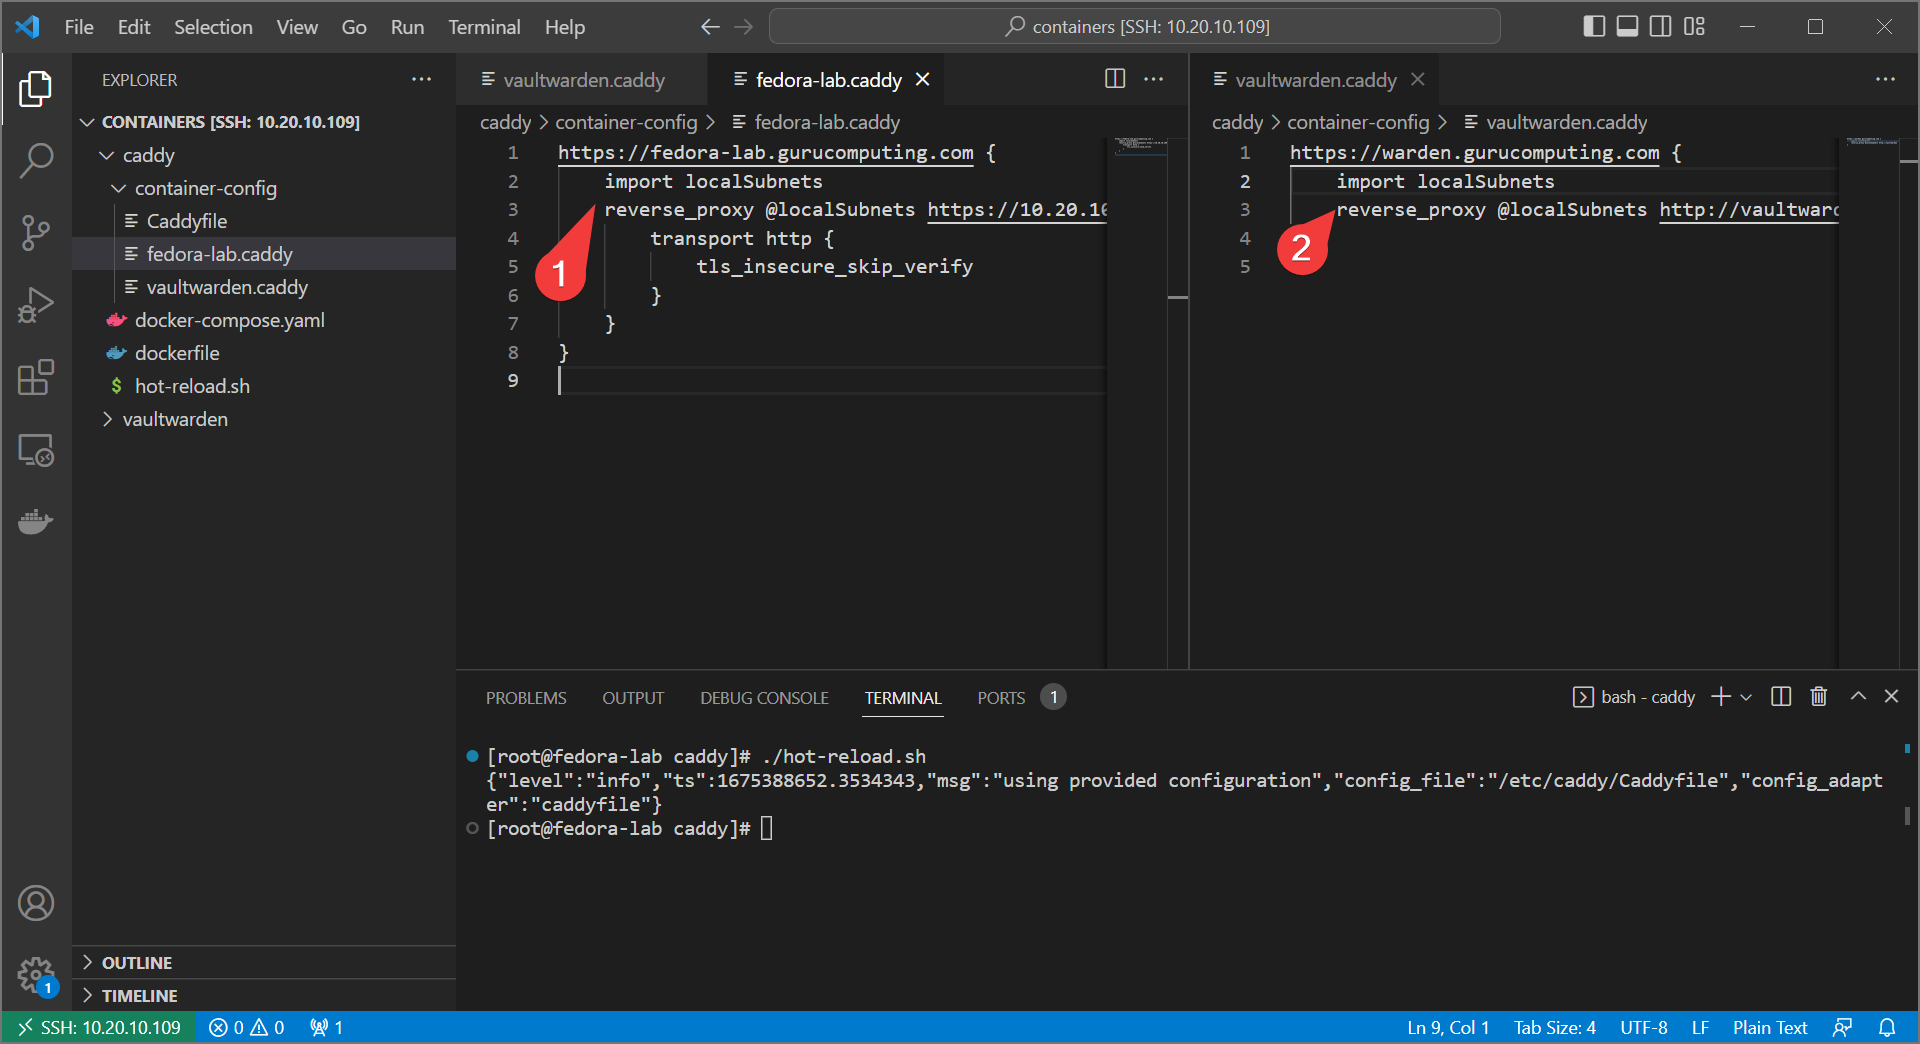
- The above means we also have to change our individual snippets, as we need to refer to sites by a host matcher. We also have to remove the
localTLSdirective.
@fedora host fedora-lab.<your-domain>
handle @fedora {
    import localSubnets
    reverse_proxy @localSubnets https://<your-IP>:9090 {
        transport http {
            tls_insecure_skip_verify
        }
    }
}
- Do the same for vaultwarden
@warden host warden.<your-domain>
handle @warden {
    import localSubnets
    reverse_proxy @localSubnets http://vaultwarden
}
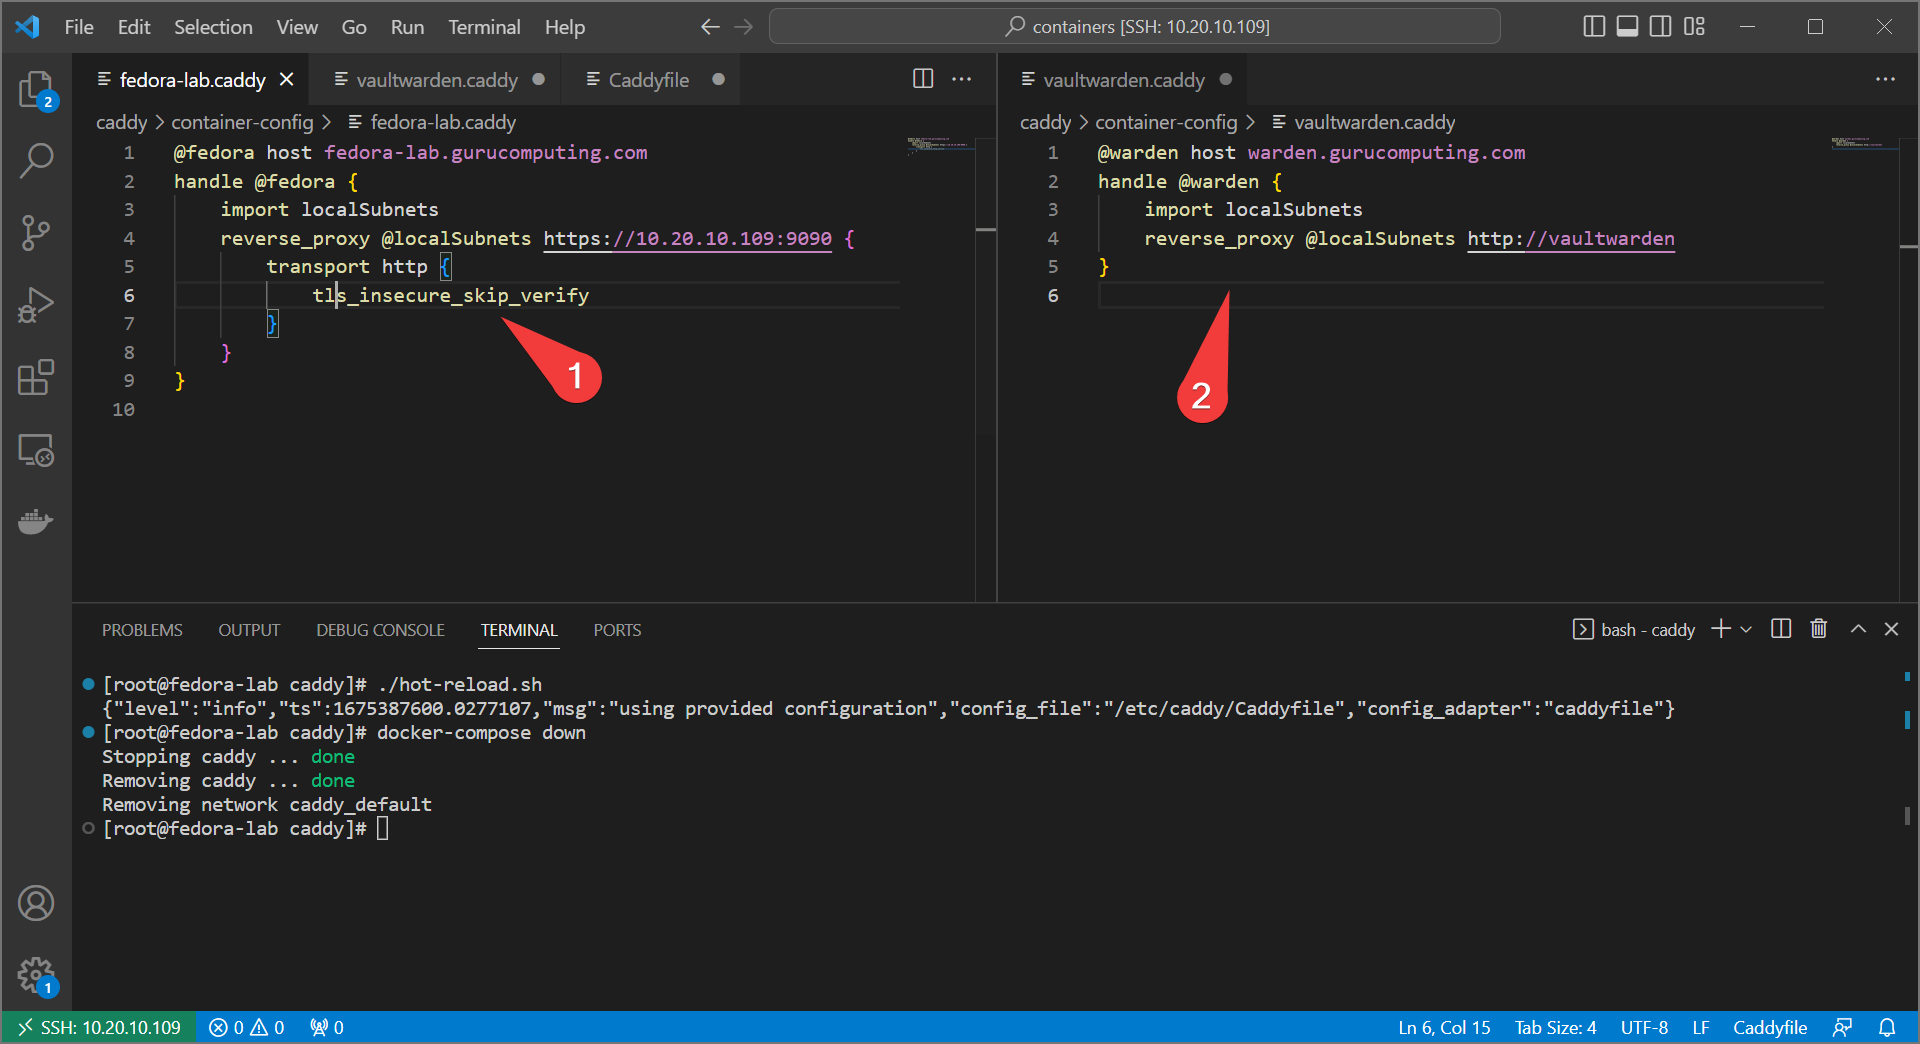
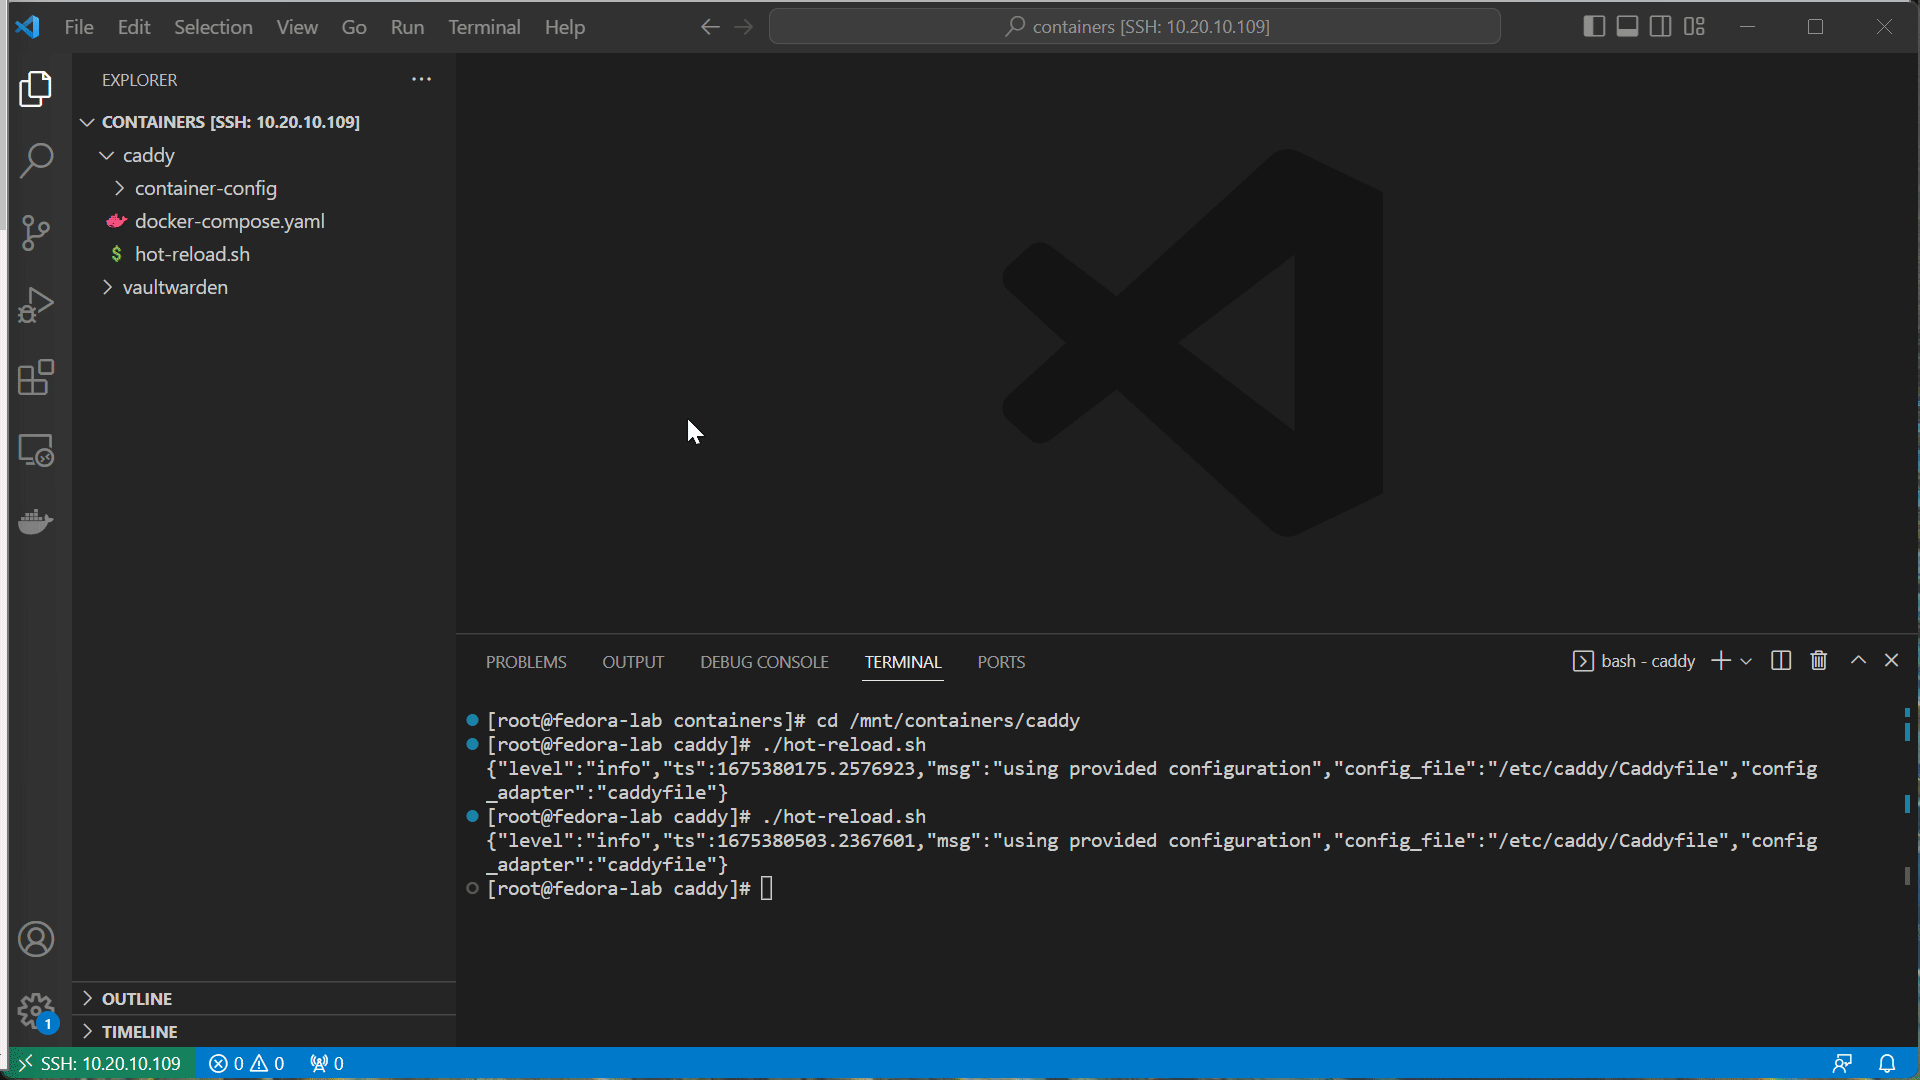
- hot-reload caddy
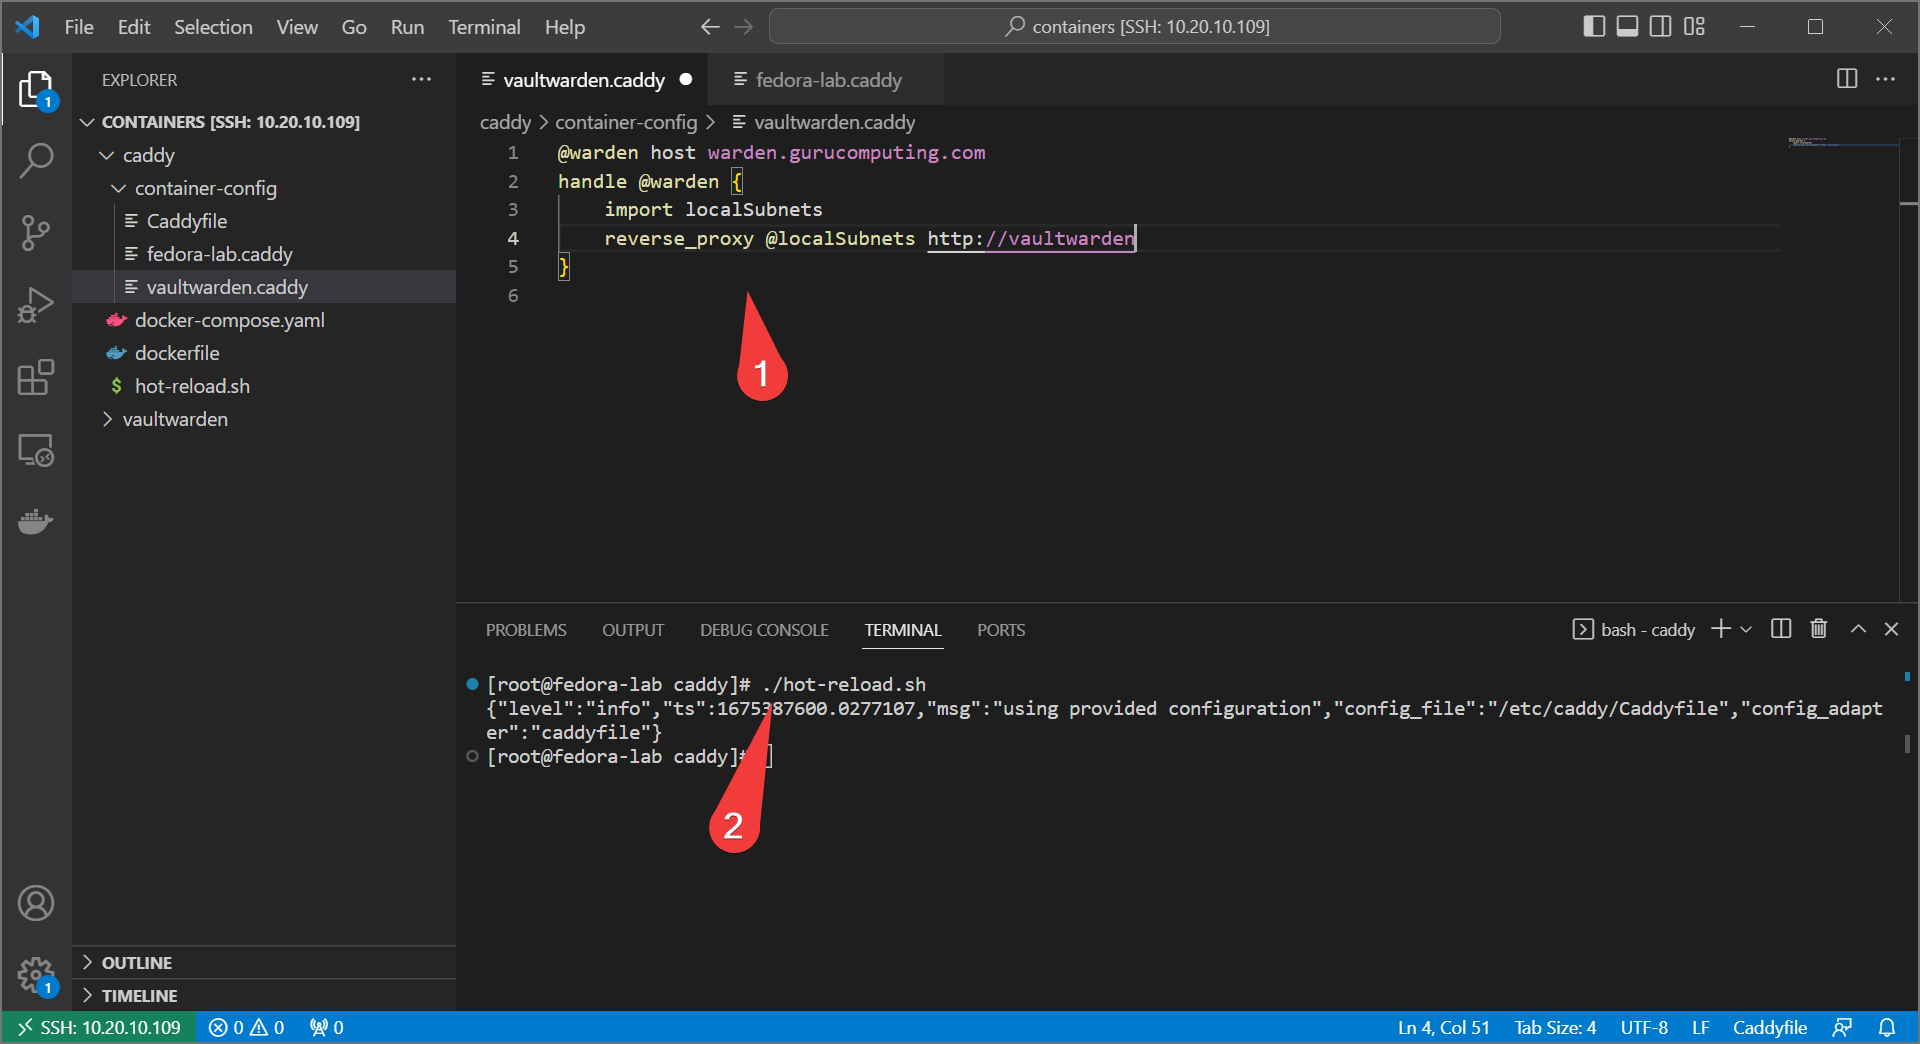
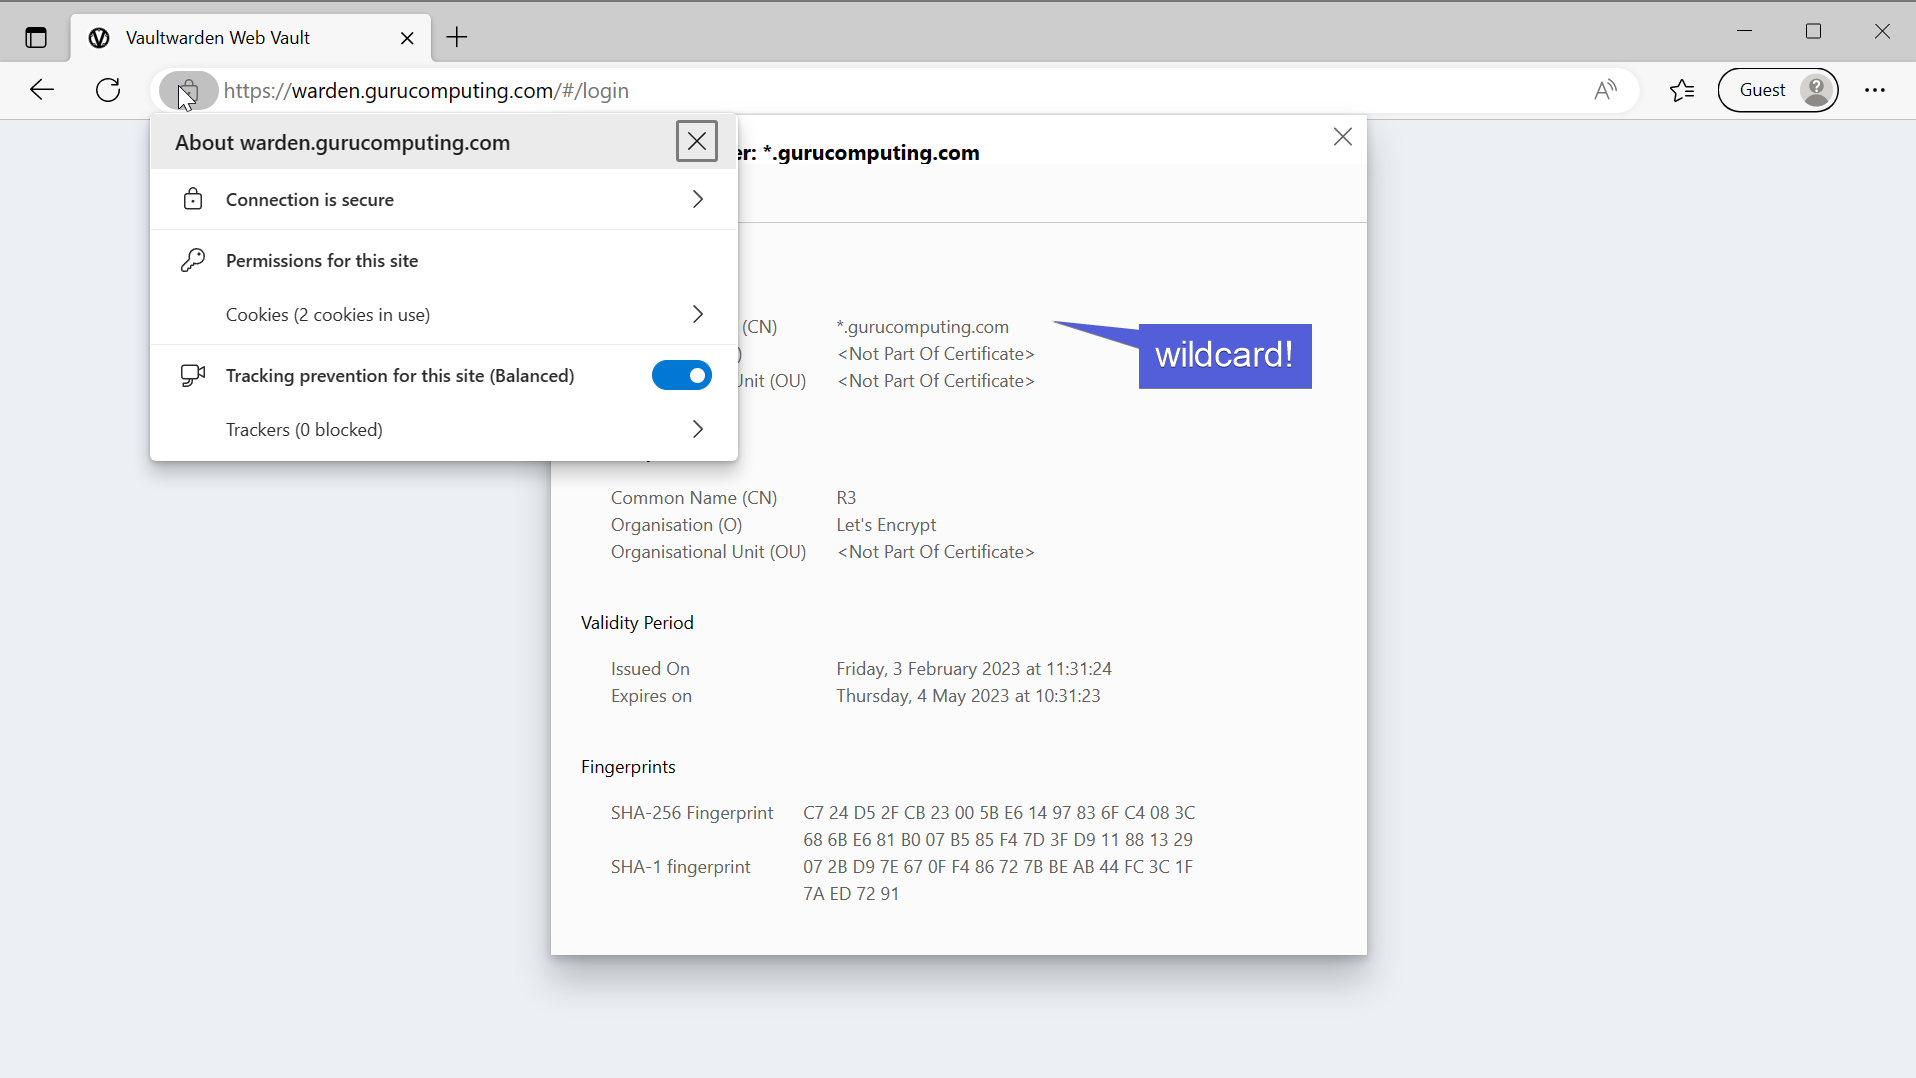
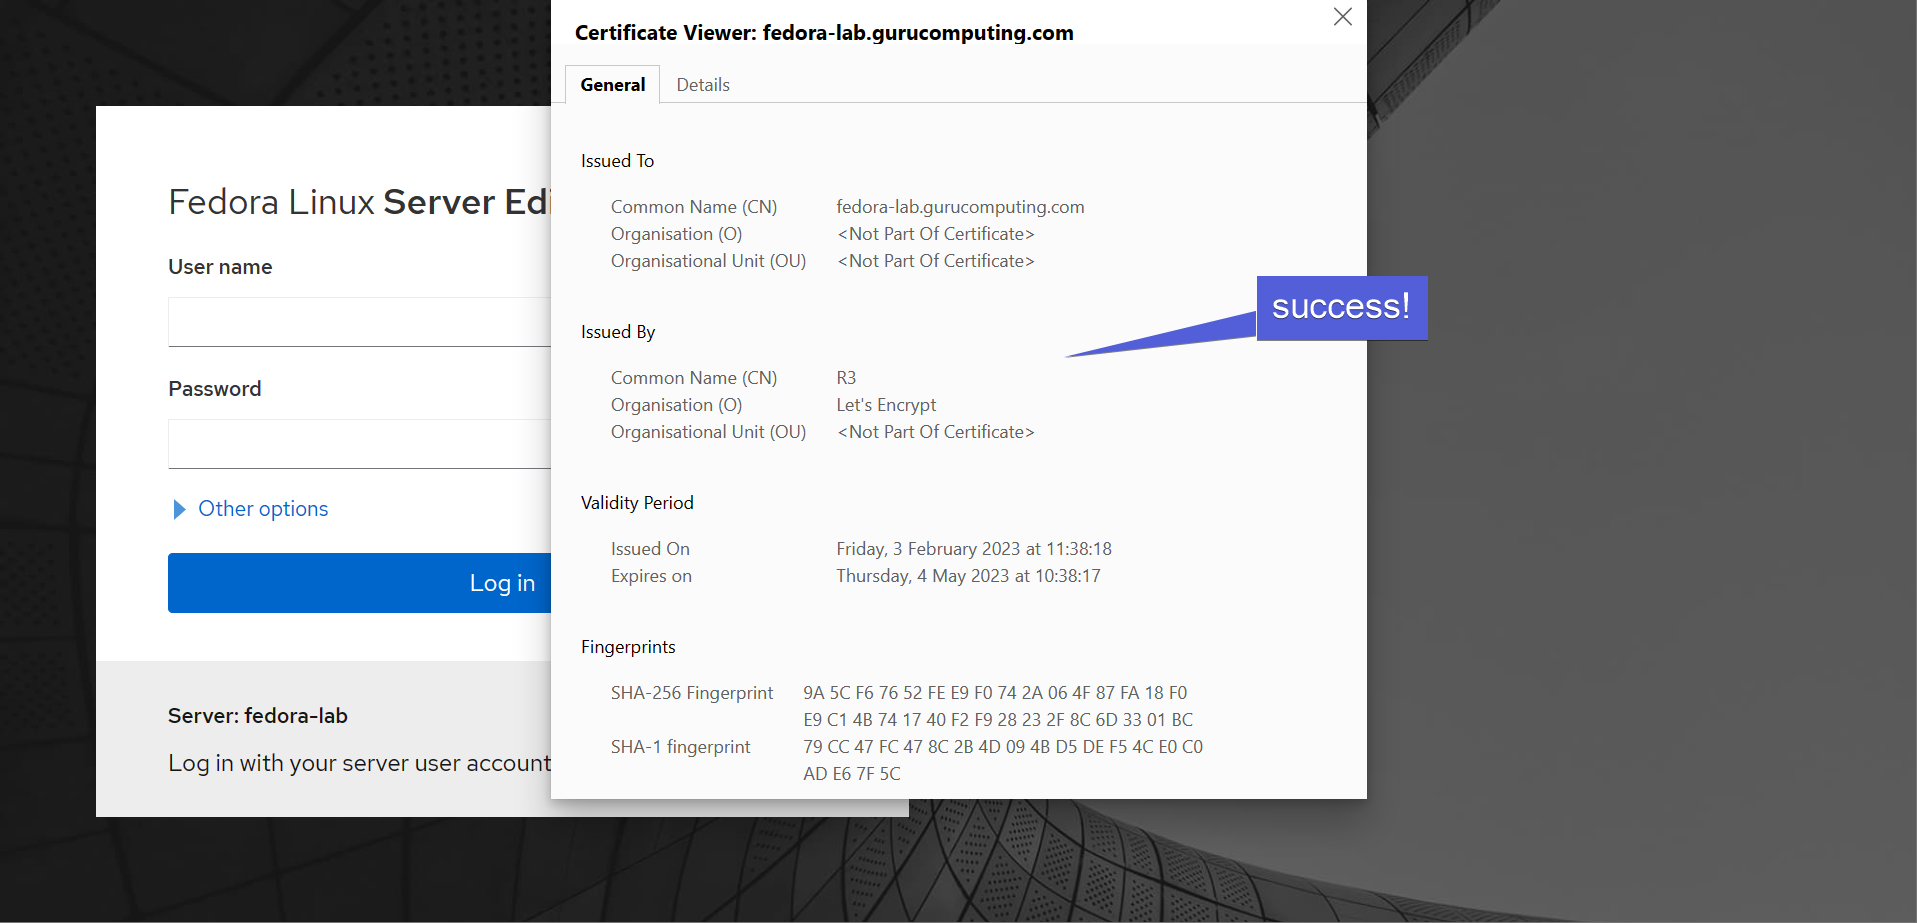
- If all goes well, both subdomains should now be using a wildcard certification!
HTTP Challenge
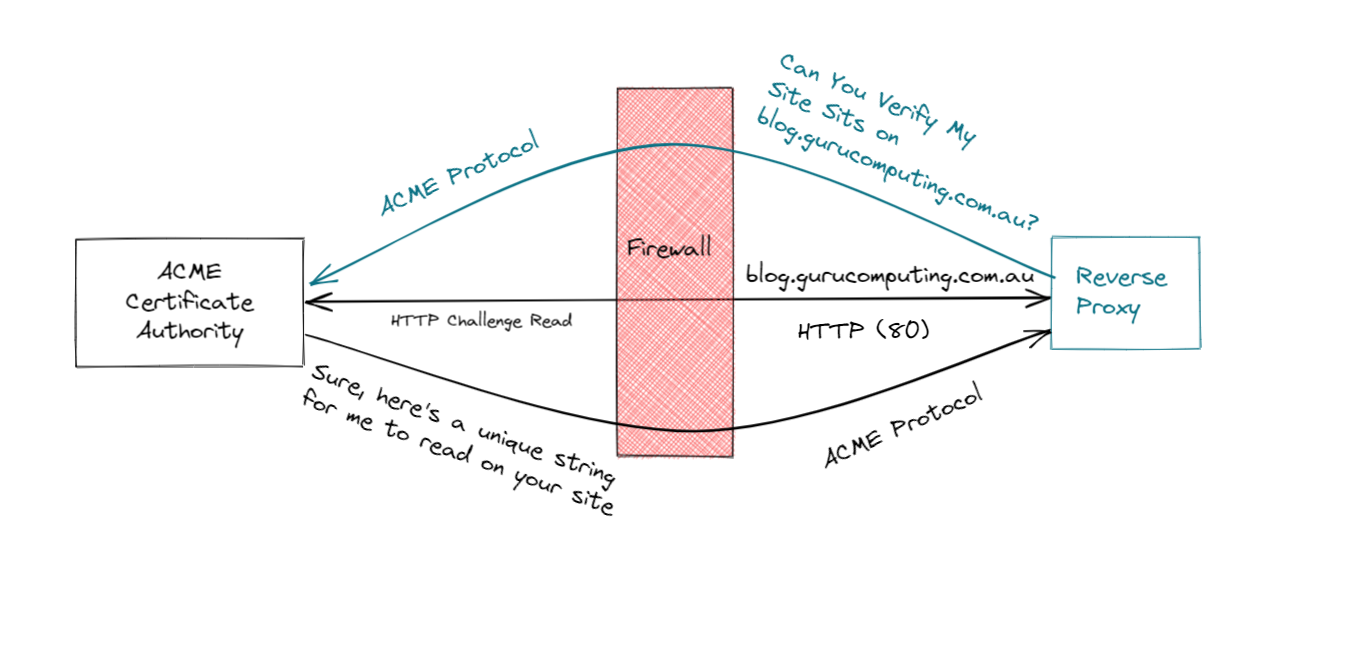
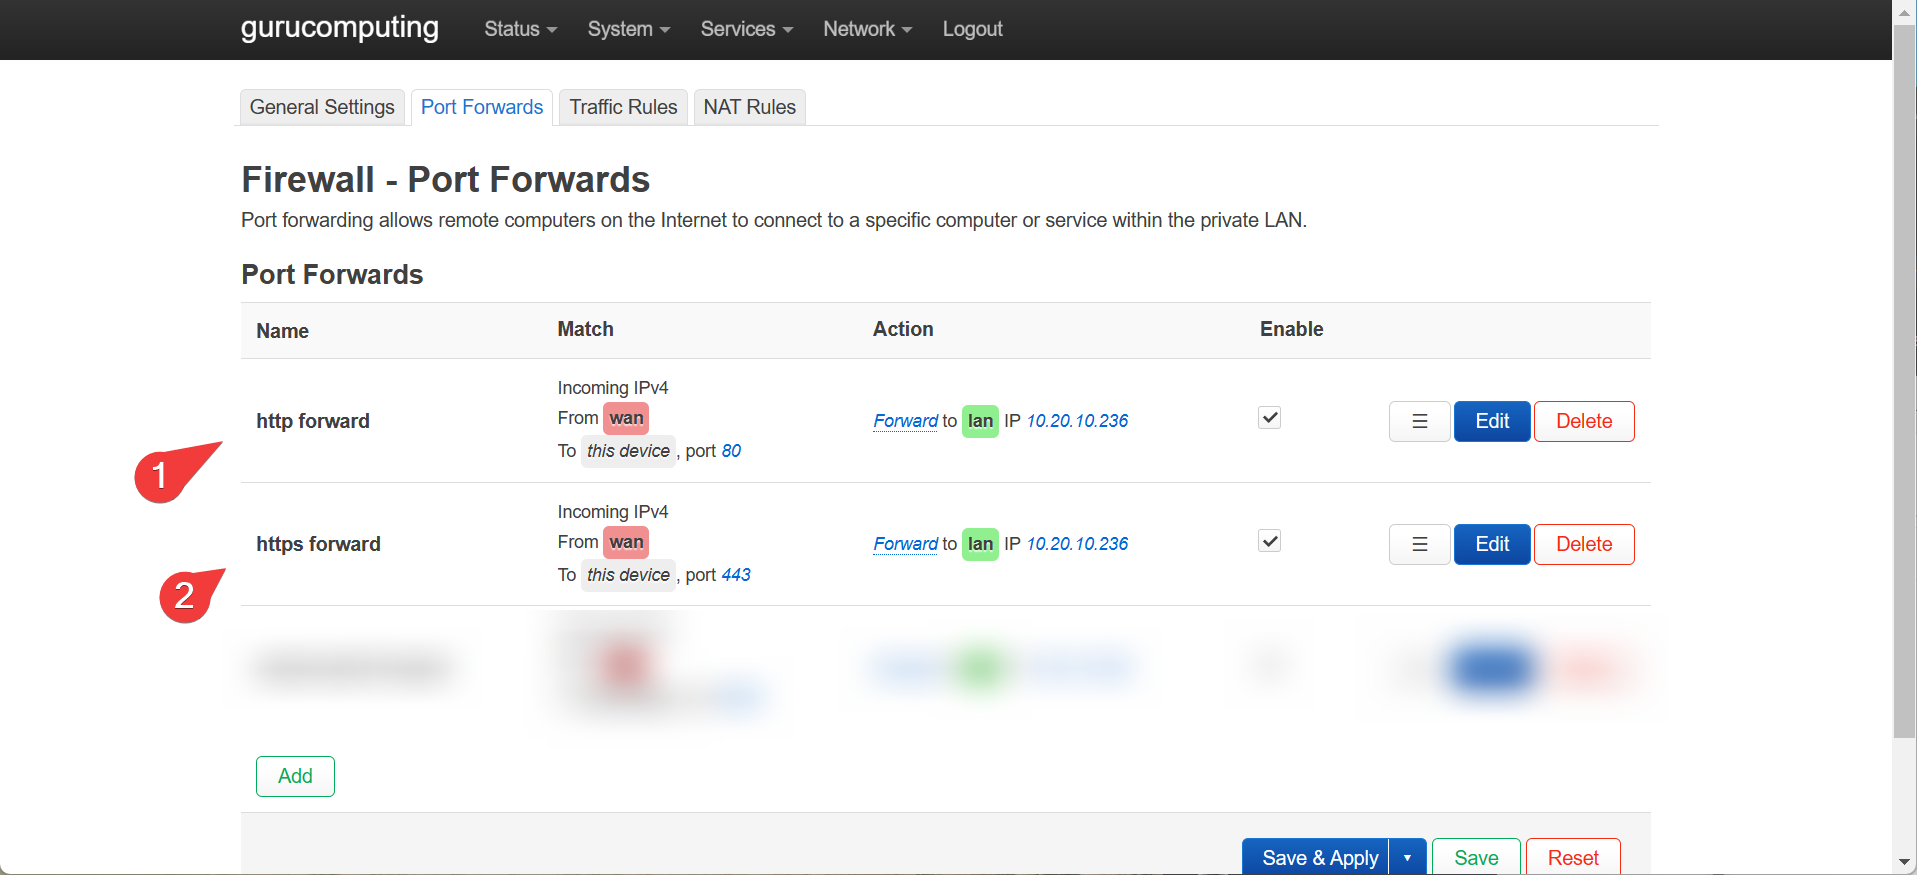
Creating an SSL cert via an HTTP challenge is, if anything, even simpler to do. However doing so requires a very specific requirement: You must forward your reverse proxy to the internet. Here is where you do so in openWRT:
Warning
Port Forwarding should only be done if you are very aware of the risks and security implications for doing so.
- Once that is done, go back to each of your
.caddyfiles (the caddyfiles from the previous article. If you followed the DNS section first, revert the configs including theCaddyfileitself). Delete theimport localTLSsections of each.
- Reload caddy, and… take a break! You’re done! by default caddy will attempt to do an ACME HTTP challenge to get certs, no extra configuration required. See if it worked!
Conclusion
We’re all done. Hooray! We’ve demonstrated the core features of caddy, and now we’re ready to use caddy to provide access control and encryption for all of our different sites.